CI/CD Databases with Liquibase
A solution for continuous database integration

When working for large organizations, we developers do not usually deploy our own applications. Therefore, we may need to leverage a migration tool to continuously integrate and deploy database schemas along with the rest of the code.
In this article, we will explore how migration tools like Liquibase can help us release software in different environments easily and reliably.
Why choosing Liquibase?
Liquibase is great for CI/CD databases, as it helps teams to automate the deployment of changes for various schemas — common in microservices architectures — across different environments (Dev, QA, Production, etc.).
Liquibase is a robust solution, which not only helps automate database changes, but also manages the database status by tracking the migration history.
It supports scripting in XML, YAML and JSON formats, which may be beneficial to work agnostically with different database engines.
Liquibase Hierarchy of Changes
The following illustration shows the “hierarchy of changes” that Liquibase proposes to create and manage database changes.

Where:
- Change Types are types of individual operations deployed into the database, such as adding a column or a primary key (See all available Change Types here).
- ChangeSet is a unit of change that groups Change Types. There are four formats you can use for database changes: SQL, XML, JSON, and YAML.
- Changelog is the master file with a list of ChangeSets in sequential order.
Liquibase Plugin for Maven
We can create a Maven project, and make use of the Liquibase plugin to deploy database changes.
The project directory structure
Use the following project structure as reference for your Maven project:
.
├── db
│   ├── changelog-master.yml
│   └── changes
│       ├── 001_createTablePerson.yml
│       ├── 002_addColumnUsername.yml
│       └── 003_addLookupTableState.yml
├── pom.xml
└── src
    ├── main
    │   └── java
    │   └── MyApp.java
    └── test
        └── MyAppTest.java
Setting up the pom.xml
Add the plugin into your pom.xml file.
In the plugin configuration we have specified the changeLogFile with the path: ${project.basedir}/db/changelog-master.yml.
To connect to the database, configure the driver (in this example, we are using MySql), the database URL, the username and the password.
Note that it is a good practice to have a different database users for Liquibase instead of the one used by the application (usually restricted to DML operations only).
Defining the Changes
In the first change, we create the person table. Therefore, we use the createTable Change Type.
When creating the changeSet, you have to specify the author and an id.
Here we have set tableName and columns. Each column has a column name, type, and a set of constraints.
Setting up the Changelog
The “Changelog Master” holds the change files placed in sequential order.
Here we used the include attribute to specify the file path.
We have also set the attribute relativeToChangeLogFile to true so that Liquibase looks for files within the db directory.
Running the Update
Run the update command below from the Liquibase Commands, to apply the changes to the database.
$ mvn liquibase:updateWhen you deploy changes, Liquibase creates/updates two tables in your database: DATABASECHANGELOG and DATABASECHANGELOGLOCK.
The first table tracks the changes deployed to keep a record of the deployments, and the second one prevents multiple instances from updating the schema at the same time.
Once the update was completed successfully, you should see the changes stored in the DATABASECHANGELOG.
DevOps Workflow
Developers will add database changes into the project’s repository. In a trunk-based development model, these changes should be integrated into the branch for continuous integration (a.k.a. the trunk).
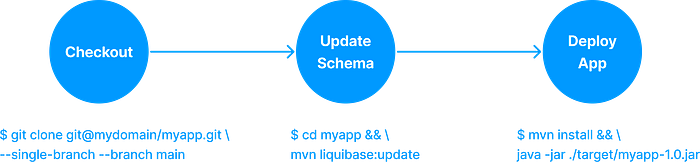
Step One: Checkout changes from source control
Checkout the trunk with the changes.
Step Two: Update the database schema
Run the Update Command to apply the changes.
Step Three: Deploy the application
Now that the schema is up to date, deploy the application.
Despite the simplicity of this example, your deployment process could be similar to the one shown below.
Summary
In this article, we learned how a migration tool like Liquibase can help us to continuously integrate and deploy database changes easily and reliably.
Thanks for reading. I hope this was helpful!
The example code is available on GitHub.